Thursday, June 1, 2017

Kale Crust Pizza

Utensils: electric skillet (aka: EOC) or pizza pan (baking sheet for non-saladmaster users) and food processor
Other Items: parchment paper


Ingredients:

  • 2-3 branches of kale (3.5 cups) trimmed and washed w/o stem 
  • 2/3 panko crumbs
  • 1 cup of shredded lowfat cheese (fresh or Parmesan)
  • 2 eggs
  • Salt and pepper


Pizza Topping Ideas:

  • Pizza sauce or Alfredo sauce
  • Shredded mozzarella cheese
  • Meat/Protein: black beans, pepperoni, salami, tofu, ham, sausage, shredded chicken, ground and seasoned turkey, bacon
  • Vegetables: bell peppers, onion (red, yellow, sweet, green), spinach, shredded carrots (use the #1 cone), shredded zucchini and yellow squash, mushrooms
  • Other: olives, diced jalapenos and chilies, stewed tomatoes, pineapple, cilantro, jalapenos, peppercinis


Instructions:

  1. Preheat EOC or oven to 350 degrees
  2. Process raw kale. Then add the panko crumbs, cheese, eggs, salt and pepper to process until a dough forms. 
  3. Place parchment paper on EOC/pizza pan or baking sheet and form kale pizza crust. You can add a little olive oil to make your hands less sticky.
  4. Bake for 15-20 minutes until firm and crust starts to brown.
  5. Add pizza ingredients and cook for 5-10 more minutes until all ingredients are heated and cheese is melted. 
  6. Let cool for a few minutes to let crust set. 


Cottage Cheese Pancake-Crepes


Tools: Large skillet (or square griddle) and a food processor
Servings: 1 large crepe or 3 small pancakes
Calories: 240
Carbohydrates: 25 grams

Ingredients
  • 1/2 cup of fat free cottage cheese
  • 1/4 cup of old fashion oats
  • 2 egg whites or 1 whole egg
  • 1 tablespoon of a sweetener such as Splenda, Stevia or Truvia, 
  • 1 teaspoon of vanilla extract

Topping Options
  • Syrup (sugar free or maple)
  • Honey or agave
  • Jelly
  • Apple butter
  • Fruit
  • Vanilla, strawberry, peach, honey nonfat or low-fat yogurt
  • Cinnamon
  • Powdered sugar
  • Peanut butter or almond butter

Directions

  1.  Preheat skillet or griddle on medium high heat. 
  2. Process all ingredients in food processor until smooth
  3. Spray skillet or griddle with non-stick spray and pour batter into 3 small pancakes or one large.
  4. Cook until easy to flip (usually about 3-5 minutes). Because it is cheese based, you will not see bubbling like a normal pancake and it will stick if flipped too soon.
  5. Top with your choice of topping. I prefer apple butter with peaches or vanilla yogurt mixed with cinnamon.


Photo: http://s3.amazonaws.com/finecooking.s3.tauntonclud.com/app/uploads/2017/04/18192518/fc35pi047-01-thumb1x1.jpg

Wednesday, May 31, 2017

Chia Seed Pudding

CHIA SEEDS! 

1 tablespoon has about 60 calories, 60 mg of calcium, 6 grams of protein, 5 grams of carbs, 5 grams of fiber and 4.5 grams of fat.

Chia seeds are unique in their ability to absorb as much as 12 times its weight in water. Mix a tablespoon of ground chia seeds with 3 tablespoons of water. Stir well, and place in the fridge to set for 15 minutes to serve as a replacement for an egg in baked goods, or add the seeds to yogurt, cereal or a smoothie to give yourself a nutrient boost.


Chia Seed Pudding Recipe

Yields 4 servings

Calorie content depends on ingredients used and will likely range between about 150-225 calories a serving.

Ingredients
·         2 cups milk (almond, coconut, cashew, cow, etc.) Or split 50/50 with 1 cup milk and 1 cup yogurt
·         1/2 cup Chia Seeds
·         1/2 teaspoon vanilla extract
·         1/8-1/4 cup maple syrup (or sub any sweetener)
·         Optional: 1/4 teaspoon cinnamon powder
·         Decorate with fruit or sliced almonds

Instructions

1.      For Blended/Smooth Version: Place all ingredients in blender and blend on high for 1-2 minutes until completely smooth.
2.      For Whole Chia Seed Version: Blend all ingredients except chia seeds in a blender until smooth (including any added flavors, fruits or chocolate). Whisk in chia seeds.
3.      Pour mixture into a jar or glass container and place in the refrigerator for at least 4 hours or overnight to let gel.
4.     It tastes best within two days after it is made.


Chocolate Version: Add 1/4 cup cocoa powder to the blended version of this recipe and/or add chocolate flavored stevia

Strawberry Version: Add 1/2 cup fresh strawberries to the blended recipe. Or, try blending fresh strawberries into a juice and use as part of the liquid in the whole chia seed recipe

Making Your Own Salad Dressing

Many of my patients have been asking about salad dressings lately. I personally make my own with ingredients found in my pantry or refrigerator. Homemade dressings are good on leafy green salads, slaws or on grains salads such as barley or bulgur. Homemade salad dressings are a quick, healthy, and cheap alternative to bottled dressing. Homemade dressings tend to be lower in sodium, sugar, and preservatives. Simple dressings take minutes to make and use only a few ingredients.

Getting Started
Most dressings need a fat, an acid, and seasoning. Examples of each are found below:
Fat: Oil, pasteurized egg, mayonnaise, sour cream, or cheese
Acid: Lemon, lime, or orange juice, or any type of vinegar (red wine, balsamic, apple cider, rice, etc.)
Seasoning: Garlic powder; mustard; salt; pepper; oregano, parsley, chives, and other herbs; or spices like curry powder, paprika, or celery seed
Keep portions of salad dressing to 2 tablespoons per serving to manage calories. You can refrigerate dressing in a sealed, airtight container (like a jar) for up to 7 days.

How to Make Salad Dressing
Use these easy steps for most salad dressing recipes:
1. Measure out the ingredients.
2. Whisk all ingredients, except the fat, in a medium-size bowl. Slowly pour in the fat while whisking the ingredients together.
3. Unless the recipe states otherwise, the dressing is ready to use on salad or other dishes. You can also make salad dressing using a jar with a screw-top lid. Add all of your ingredients to the jar, including the fat. Tightly screw on the lid. Shake the jar until all of the ingredients are well combined.

Recipe Ideas
Lemon Vinaigrette: Squeeze the juice of 1 lemon into a bowl. Remove any seeds. Add salt and pepper to taste and whisk well to combine. Slowly whisk in ¼ cup extra
virgin olive oil. Makes 2 servings.
Balsamic Vinaigrette: Finely chop 1 clove peeled garlic. In a medium-size bowl, whisk together ¼ cup balsamic vinegar, 1 teaspoon honey, and salt and pepper to taste. Add the garlic to the bowl and whisk well to combine. Continue to whisk while slowly adding ½ cup extra virgin olive oil. Makes 6 servings.
Honey-Mustard Dressing: Add ¼ cup honey, ¼ cup Dijon mustard, ¼ cup reduced-fat plain Greek yogurt, and ⅛ teaspoon kosher salt to a medium-size bowl. Whisk well to combine. Add pepper to taste. Makes 6 servings.

Tips
• Add ¼–½ teaspoon Dijon mustard to salad dressings so the oil and vinegar won’t separate.
• When making creamy dressings, use low-fat or fat-free Greek yogurt or reduced-fat sour cream instead of mayonnaise or sour cream. This can help lower the calories.

• Use homemade dressing as a marinade for chicken or vegetables.

Ube Steamed Rice Cakes


Putong Ube a la Marketman


  • 2 lbs of ube (2 large yams)/// 1.5 cups of the grated ube (Cook ube 30-35 minutes)
  • 1 cup of rice flour
  • 3/4 cup of freshly squeezed coconut milk/cream from the first pressing
  • 3/4 cup of Carnation evaporated milk
  • 1/2 cup of white sugar
  • 1/4 cup of all-purpose flour
  • 1 1/2 tablespoons of baking powder
  • Pinch of salt

Directions:
Mix this well and you get a lavender batter that is a little less thick than pancake batters. You may adjust the ube content at this point or add a little rice flour if you think the consistency doesn’t seem right.
Melt sweet butter and brush this generously inside the egg cups
Steam for 8-10 minutes.


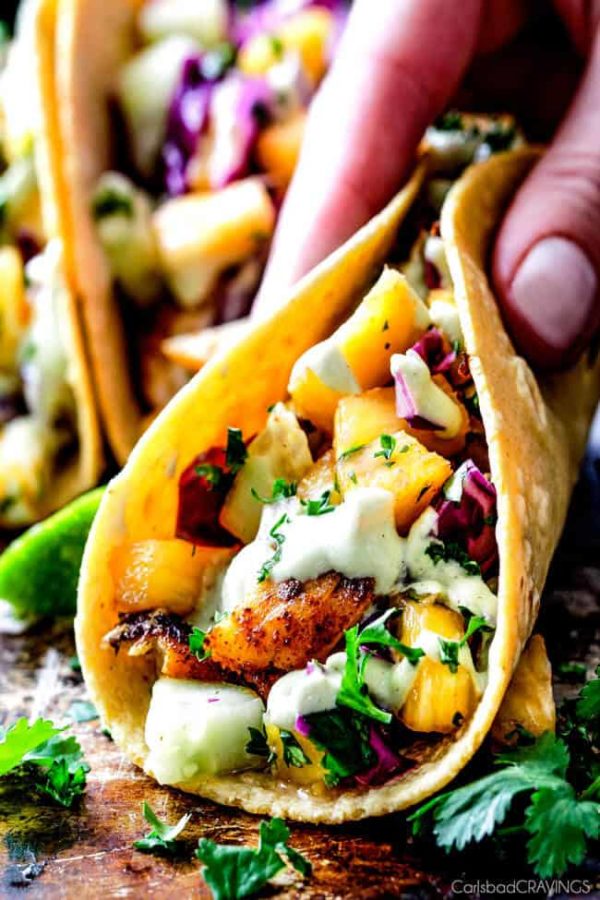
Blackened Fish Tacos***** Yum

Blackened Fish Tacos with Pineapple Cucumber Slaw

Prep Time: 20 minutes
Cook Time: 6 minutes
Servings: 4-6


INGREDIENTS

1.5 pounds tilapia
6-8 6-inch corn tortillas, warmed
1/2 cup Mexican cheese blend, more or less
2 tablespoon olive oil, divided
1 tablespoon butter


Marinade

3 tablespoons olive oil
3 tablespoons lime juice
1 tablespoon reduced sodium soy sauce
1 1/2 tablespoons Spice Rub (in directions)


Spice Rub

1 TBS EACH chili powder, brown sugar
1 tsp EACH smoked paprika, cumin, garlic pwdr, onion pwdr, salt
1/2 tsp EACH dried oregano, pepper
1/4 teaspoon cayenne pepper (optional)


Pineapple Cucumber Slaw

2 cups chopped fresh pineapple
2 cups thinly sliced red cabbage
1 medium cucumber, peeled and chopped
1/4 cup chopped red onion
1/2 cup loosely packed cilantro, chopped
1 tablespoon lime juice
salt and pepper to taste


Extras

1 medium avocado
Greek yogurt or sour cream
Like
Hot sauce


INSTRUCTIONS

Marinade: Mix together all of the Spice Rub ingredients in a medium bowl. Remove 1 1/2 tablespoons Spice Rub and add this to a large freezer bag along with all of the Marinade ingredients. Whisk together then add fish. Marinate at room temperature for 30 minutes. You will use remaining spices later.


Pineapple Cucumber Slaw: Add all of the Pineapple Cucumber Slaw ingredients to a large bowl. Toss to combine. Refrigerate until ready to serve.


Spice Rub: After 30-60 minutes (no more), remove fish from marinade and pat dry. Mix remaining Spice Rub together with 1 tablespoon olive oil in a small bowl. Rub evenly over fish and let sit for 15 minutes at room temperature.


Cook: In a large skillet, heat 1 tablespoon olive oil over medium high heat. As soon as it melts add fillets and cook approximately 3 minutes per side, or until nicely blackened.


Assemble: Remove fish from skillet and break into large pieces. Evenly divide fish among tortillas then top with cheese, Pineapple Cucumber Slaw, and other desired toppings. Garnish with additional lime and hot sauce if desired.

Cactus aka: nopal

I was walking through the cafeteria at my college when the cook approached me with a sample of grilled cactus. I fell in love. Since then, I bring these things to bbqs and camping trips so that my friends and family have even more reasons to call me a crazy dietitian. The prickly pear cactus, also called nopal, is promoted for treating diabetes, high cholesterol, obesity and hangovers. It is also touted for its antiviral and anti-inflammatory properties. It is popular in many areas of the world, particularly Latin America, because it's high in fiber, antioxidants and carotenoids. It tastes, to me, like a cross between asparagus, lime and artichoke. I’ve used it in quiches, added it to salads and lasagnas, boiled and grill it. You can do so much more with it though. Look on Pinterest and you’ll see how these lovely cactus leaves are commonly served in eggs, salads, chili, in place of a tortilla and stir-fry dishes. Cactus smoothie anyone?


Grilling Cactus
Scrape or cut the cactus spines off the nopales, rinse them off and pat them dry. Brush olive oil over both sides of the pad and season them with salt, pepper and garlic powder (as much as you prefer). Grill on medium heat for 2-3 minutes and flip over and grill the other side for another 2-3 minutes. That’s it! You can always grill it longer for your preferred texture.

Boiling Cactus
Scrape or cut the cactus spines off the nopales. Cut the cactus paddles in small strips (green bean or asparagus size) or into dice-size squares. Once the water is boiling add the cactus. Boil uncovered for about 8-10 minutes or until tender. You can eat as a side, add to casseroles or salads or dice them into an omelet. 


Image result for cactus jokes

Monday, May 8, 2017

Cowboy Casserole

COWBOY CASSEROLE
2 lbs ground beef or turkey                    
1 tsp chili powder                  
1 tsp onion powder               
Cheddar cheese
1 tsp garlic powder               
16 oz. Bag corn                       
16 oz. Green beans                 
28 oz. Can seasoned tomatoes     
Fritos

De-fat hamburger in 3 qt + inset until brown.  Preheat skillet to 350 and add defatted beef.  Season with chili, onion & garlic powder.  Add corn, green beans, tomatoes and ½ of chips.  Mix well and top with remaining chips.  Top with cheese (#2 cone).  Cover and cook at 350 until valve clicks.  Reduce to 200 for 20 minutes.

Without Fritos, 1/8th  of this recipe is about 325 calories, 27 grams of protien, 13 grams of fat, 433 mg of sodium and 20 grams of carbs

Tuesday, March 14, 2017

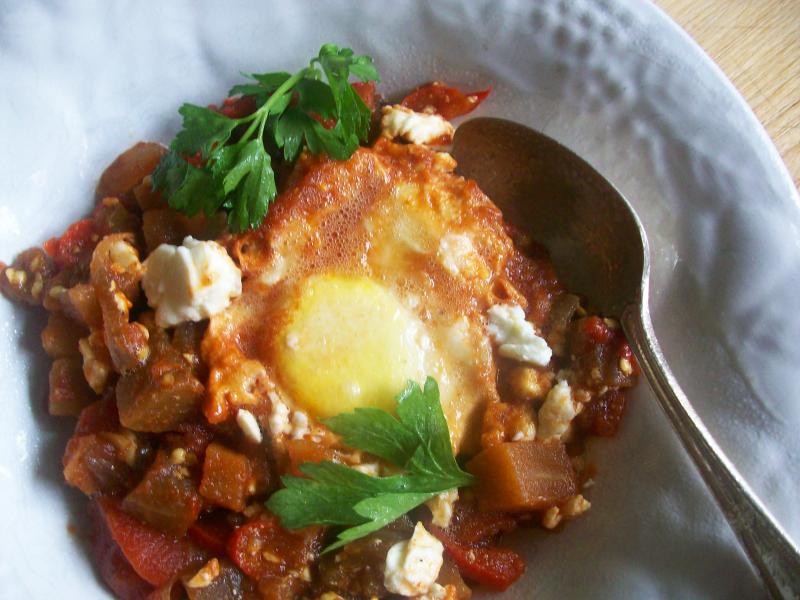
Shakshuka with Eggplant


Saladmaster Recipe Shakshuka with Eggplant
Makes: 
6 servings
Use the 12 in. Electric Oil Core Skillet cover with your 12 in. Chef's Gourmet Skillet. 

Ingredients
1 medium eggplant, peeled and diced in ½-inch cubes
12 teaspoon natural salt
1 medium onion, thinly sliced, use Cone #4
1 medium sweet red or orange pepper, thinly sliced, use Cone #4
1 small jalapeño, remove some of the seeds, finely diced
2 cloves garlic, shredded, use Cone #1
1 teaspoon ground cumin
1 teaspoon sweet paprika
1 bay leaf
28 ounces diced tomatoes with juices
salt and pepper, to taste
6 large eggs
6 ounces feta cheese, crumbled

Directions
Place diced eggplant into a colander and toss with ½ teaspoon salt. Set aside while preparing the rest of the vegetables.
Preheat skillet over medium heat. When several drops of water sprinkled in skillet skitter and dissipate, approximately 5 minutes, add onions and sauté for 4 - 5 minutes until softened and lightly browned.
Add red peppers, jalapeños and garlic and sauté for 3 minutes.
Add eggplant and sauté for 3 - 5 minutes until eggplant starts to soften, stirring vegetables during cooking.
Add cumin, sweet paprika and bay leaf. Toss to combine and toast spices.
Add tomatoes and juices and stir to combine. Reduce heat to low and place 12 in. Electric Oil Core Skillet cover on skillet. Cook sauce for 30 - 35 minutes, until vegetables are tender.
Remove cover and make six indents in sauce with back of spoon. Crack eggs, one at a time, into a small bowl and gently pour one egg into each hole. Sprinkle feta cheese over top. Cover and cook for 5 - 7 minutes, depending on how you like your eggs cooked.
Serve immediately and garnish with chopped parsley or cilantro.

Tips
Substitute eggplant for summer squash or zucchini.
Add in chicken sausage for a heartier brunch-style entrée or substitute for firm tofu, cut into chunks.
Instead of poaching eggs in sauce, scramble eggs and pour a small amount into each indent.


Monday, January 30, 2017

SPAM Fried Rice

SPAM FRIED RICE
http://damndelicious.net/wp-content/uploads/2013/07/IMG_0120edit-340x340.jpgYIELD: 4 SERVINGS
UTENSILS: Large skillet, MP5 or 5 qt saucepan to make rice

INGREDIENTS:
1 tablespoon vegetable oil, divided
2 large eggs, beaten
2 cloves garlic, minced
6 ounces Spam, diced (Turkey Spam)
1/2 cup frozen corn
1/2 cup frozen peas
1/2 cup frozen diced carrots
3 cups cooked rice
1 1/2 tablespoons soy sauce
1/2 tablespoon fish sauce
1/4 teaspoon sesame oil
1/4 teaspoon white pepper
2 green onions, sliced
Sriracha, for serving

DIRECTIONS:
1.     Precook rice in MP5 or Saucepan.
2.     Spray cooking spray in a large skillet over low heat. Add eggs and cook until cooked through, about 2-3 minutes per side, flipping only once. Let cool before dicing into small pieces.
3.     Heat 1 tablespoon vegetable oil in the skillet over medium high heat. Add garlic and Spam, and cook, stirring often, until light golden brown, about 3-4 minutes.
4.     Add corn, peas and carrots. Cook, stirring constantly, until vegetables are tender, about 1-2 minutes.
5.     Add rice and gently toss to combine.
6.     Add soy sauce, fish sauce, sesame oil and white pepper. Cook, stirring constantly, until heated through, about 1-2 minutes.
7.     Stir in green onions and eggs.

8.     Serve immediately, drizzled with Sriracha, if desired.

Monday, August 1, 2016

Spring Rolls with Peanut Dipping Sauce

Take from: http://sallysbakingaddiction.com/2015/04/07/homemade-fresh-summer-rolls-with-easy-peanut-dipping-sauce/  website

Homemade Fresh Summer Rolls with Easy Peanut Dipping Sauce are healthy, adaptable, and make a wonderful light dinner, lunch, or appetizer. Here's exactly how I make them. Serves 2-6 depending if it's a meal, appetizer, or how hungry you are.

Ingredients:

EASY PEANUT DIPPING SAUCE
1/4 cup creamy peanut butter
1 Tablespoon hoisin sauce2
2 teaspoons soy sauce
1 clove garlic, mashed (or about 1 teaspoon minced)
1 teaspoon Sriracha sauce or a chile garlic sauce, optional for spice
1-2 Tablespoons warm water, or more as needed
optional garnish: crushed peanuts, sprinkle of crushed red pepper

SUMMER ROLLS
10 spring roll rice paper wrappers
1 large carrot, peeled and julienned
1 large cucumber, julienned (you can peel, but I don't)
1/2 of a large red pepper, julienned
1/3 cup chopped purple cabbage
1 ounce cooked rice noodles/rice vermicelli (optional)
1 avocado, sliced
handful fresh cilantro (and/or mint, basil)
5 large green lettuce leaves (romaine, butter, etc), torn in half
20 medium cooked shrimp, peeled and sliced in half length-wise
sesame seeds for garnish (optional)

Directions:

First, read through the post above to learn some tips/tricks for making these summer rolls. Also, make sure every single ingredient in the summer rolls is prepared/chopped/cooked before you assembling.
Prepare the dipping sauce: You can whisk everything together in a bowl or use a food processor. I always whisk them because it saves me from cleaning the food processor. Add everything to a medium bowl (except water and optional garnish) and whisk until smooth. Add 1-2 Tablespoons of warm water or until you reach desired thinness. Pour into a serving bowl/ramekin and top with garnish. Set aside.
Prepare the rice paper wrappers: Pour warm water into a large bowl or 9-inch square or round baking pan. The baking pan is what I always use. Working with one at a time, dip the rice paper wrapper into the warm water for 15-20 seconds (or whatever the package suggests). Usually it's around that time. You want the wrapper to be soft, yet still slightly firm and pliable. Immediately remove from the water and place flat onto a work surface such as a large plastic or ceramic cutting board. Sometimes I use a large wood cutting board, but the wrappers stick to it a little more. Pat the wrapper slightly dry.
Fill the rolls: Place a few sticks of carrot, cucumber, red pepper, and a sprinkle of cabbage on top of the bottom 1/3 of the rice paper as explained and pictured in the post. Then, a small amount of noodles (if using), a slice or two of avocado and a bit of cilantro. Lay 1/2 of a lettuce leaf on top and 4 slices of shrimp on top-- as pictured above. Remember, do not overstuff the roll. Start small then add more, as needed, as you roll each one.
Roll them: Roll everything up tightly. To do so, gently pull up the bottom of the roll and roll over the filling. Then, roll and use your hands to tuck the filling in as you go. It's basically like you're rolling a burrito! Remember, you want a very tight roll. You can fold in the sides of the rice paper roll if you wish, but sometimes I don't.
After rolling each, place on a serving plate. Cut in half, sprinkle with sesame seeds, and serve with peanut sauce. This amount is enough for Kevin and I and there are always a couple leftover for lunch the next day.
Make ahead tip/storing: Wrap rolls individually in plastic wrap (suggested to prevent sticking and then tearing) and layer in a tupperware between sheets of parchment or wax paper. Store up to 2-3 days. In terms of taste, the rolls are best served fresh the day they are made. Cover sauce tightly and store in the refrigerator for a couple days.


Hoisin sauce is found in the Asian section of grocery stores. It's everywhere. It's a pungent sauce typically used in Asian cuisine as a glaze for meats, in stir fries, or as dipping sauce. It's where most of the peanut sauce's flavor comes from. I do not suggest leaving it out. This stuff is delicious!
As I mention a few times in the post, these ingredients can be played around with based on what you like/dietary needs. The obvious necessary ingredients are the rice papers and crunchy veggies.

Monday, July 25, 2016

Penne or Rotini with Kale, Tomatoes, Bell Peppers and Olives

Makes: 4 servings
Utensil: Saladmaster Machine (cone #3)
5 Qt./4.7 L Roaster with Cover
5 Qt./4.7 L Gourmet Wok with Cover

Ingredients:
  • 1 onion, processed, use Cone #3
  • 5 cups kale, chopped (or more)
  • I can of stewed tomatoes, undrained
  • 29 ounces chopped fire-roasted red bell pepper, undrained
  • 1⁄2 cup Kalamata olives, pitted and sliced
  • 1 tablespoon fresh parsley, chopped
  • 8 ounces uncooked whole-wheat penne pasta
  • 1⁄4 cup Parmesan cheese or nutritional yeast (feta crumble would be amazing as well)
  • Optional: to make it heartier, add a can of white beans. You can always add other things like a chili pepper  or jalapenos (cooked), cooked cactus pieces or red onion (uncooked). 

Directions:
  1. Preheat wok over medium heat. When several drops of water sprinkled on pan skitter and dissipate, add onions. Sauté for approximately 3 minutes.
  2. Add kale, bell peppers and tomatoes. Cover and cook. When Vapo-Valve™ clicks, reduce heat to low and cook for 15 minutes.
  3. Add olives and parsley. Cook for an additional 5 minutes.
  4. Meanwhile, in roaster, cook pasta according to package directions. Drain and transfer to a serving bowl.
  5. Add kale mixture and toss gently. Serve immediately.
  6. Sprinkle nutritional yeast or Parmesan substitute over top, if using.

Tuesday, June 14, 2016

Cream of Celery Casserole

Utensils: Electric skillet for Saladmaster users; frying pan and casserole dish for regular cookware users.

Ingredients:

  • 1 can of cream of celery*
  • 2-3 onions diced
  • 1/2-3/4 stalk of celery
  • 3/4 cup frozen corn
  • 1 can of black eyed peas
  • 1/2 pound pound turkey
  • Whole wheat noodles (precooked** when using the oven method; raw using Saladamaster)
  • 1 tablespoon basil
  • 1 tablespoon oregano
  • 1/2 tablespoon garlic powder

Directions:

1. Cook ground turkey with onions and celery until celery is well done.
2. Place half the mixture in the bottom of the pan (reserve half  for top layer). Then layer corn and black eyed peas.
3. Place enough noodles (**dry for Saladmaster users/cooked for oven users) to cover the pan. Then layer 2nd half of ground turkey mixture.
4. Cover with cream of celery soup (pre-mixed with 1 can of water). *For Saladmaster users, add at least one more can of water to help cook the noodles.

Monday, June 6, 2016

Chicken Adobo (Taken from the Saladmaster website)

Makes:  8 servings
Utensils:
  • Saladmaster Machine
  • 5 Qt./4.7 L Roaster with Cover
  • large mixing bowl

Contributed By:
Cathy Vogt
Certified Health Coach & Natural Foods Chef
Adobo is a very popular method of preparing meat, chicken and fish in Filipino cuisine. The adobo-style of preparation was used as a way of preserving meats before refrigerators. There are now many variations to this dish, but the main ingredients include soy sauce and vinegar.

Ingredients

  • 4 pounds chicken thighs, bone-in or whole chicken cut into pieces
  • 3⁄4 cup natural soy sauce or tamari
  • 1 small onion, strung, use Cone #2
  • 4 cloves garlic, peeled and crushed
  • 1⁄2 cup Filipino palm vinegar
  • 1⁄4 cup water
  • 2 bay leaves
  • 1 teaspoon black pepper, ground


Directions

Trim excess fat from chicken. Place chicken in a bowl, pour ¼ cup of soy sauce over chicken and toss to combine. Marinate for 30 minutes.
Preheat roaster over medium heat. When several drops of water sprinkled in roaster skitter and dissipate, remove chicken from soy sauce, shake off excess sauce and place skin side down in roaster. Cook for 3 - 4 minutes on each side until golden brown. Cook chicken in 2 batches; do not overcrowd roaster. Remove chicken when it is browned and set aside.
Add onions and garlic to roaster and sauté for several minutes, until softened.
Add remaining soy sauce, vinegar, water, bay leaves and ground pepper. Stir to combine.
Add browned chicken. Stir to combine and cover.
When Vapo-Valve™ clicks, reduce heat to low. Cook chicken for 35 - 40 minutes or until internal temperature when tested with a thermometer reaches 165°F/74°C.
Remove cover and turn heat to medium. Cook for an additional 10 minutes until liquid reduces.
Serve chicken with adobo sauce.
Tips

Chicken adobo is traditionally served with white rice.
Substitute palm vinegar for cider vinegar, white vinegar or coconut vinegar.

- See more at: http://recipes.saladmaster.com/recipe/chicken-adobo#sthash.iAzmayPg.dpuf

Wednesday, March 16, 2016

Eggplant Pizza


 Ingredients:
 
  • Eggplant
     
  • Favorite tomato sauce
     
  • Cheese
     
  • Pepperoni


Instructions:

1. Slice eggplant into 1” slices, and place them on lined baking tray.
 
2. Bake at 400 degrees for 5 minutes per side.
 
3. Top them with around 2 tablespoons of tomato sauce, a handful of cheese and some pepperoni. (You can substitute your favorite toppings, of course!)
 
4. Broil the pizzas for 3-5 minutes, until the cheese is bubbly and slightly golden around the edges.

All about EGGS... They are EGG-cellent!


Egg-buying cheat sheet: what the claims mean

Shopping the egg section of the grocery store can be perplexing, with claims crammed onto cartons and prices ranging from $1.98 to more than $6 a dozen. It’s nearly impossible to know which is better nutritionally (do we really need fertile eggs? and what’s the difference between cage-free and free-roaming?), so we’ve put together an egg-buying cheat-sheet that breaks down what the labels and claims mean, and when they may be worth the extra money.

Regardless of the type of egg you buy, you can cut back on fat and calories without sacrificing protein by using just one whole egg and adding extra egg whites.

Brown egg

They’re associated with being more natural and nutritious. The reality? It’s simply the breed of the hen that determines the color of the eggs.

Worth any extra cost? No. There’s no significant nutritional difference between white and brown eggs, and brown eggs aren’t more “natural” than white. The main reason brown eggs tend to cost more is that the hens that lay brown eggs are larger, and therefore require more feed.

Fertile

Most eggs sold today are infertile, because roosters aren’t housed with most egg-laying hens. Fertile eggs are laid by hens that have mated with roosters, so these eggs can be incubated and developed into chicks. Buying fertile eggs at the grocery store doesn’t mean you’ll end up with chicks, though, because refrigeration stops the growth process.

Worth any extra cost? No. Not only are fertile eggs no more nutritious than non-fertile eggs, they also have a shorter shelf life.

Cage-free

Also labeled as “from free-roaming hens,” cage-free eggs are laid by hens that are allowed to roam in a room or open area, usually in a barn or poultry house.

Worth any extra cost? Maybe, if the living conditions of the hens is important to you. But keep in mind that cage-free hens don’t necessary have access to the outdoors, and they still may live in crowded barns. As far as nutritional content, cage-free eggs are no better than traditional eggs.

Free-range

The label may also refer to these eggs as “pasture fed,” meaning that they are produced by hens raised outdoors or with access to outdoors.

Worth any extra cost? Maybe, if the hens’ living conditions are important to you, although no standards currently exist to define the outdoor environment, and again, the nutritional content is the same as traditionally produced eggs.

100 percent natural

The term “natural” has nothing to do with how the chicken was raised; it simply means that nothing was added to the egg, such as flavorings, brines or coloring.

Worth any extra cost? No. All eggs meet the criteria for being 100 percent natural or all-natural.

Organic

Unlike the term “natural,” USDA Organic label claims are highly regulated, although some state and other certification programs can differ. Organic eggs are from uncaged hens that have been raised according to the USDA’s National Organic Program guidelines, meaning that they must be allowed free range of their houses, as well as outdoor access (although the amount of time outside isn’t specified). These hens are also fed an organic diet consisting of feed that wasn’t treated with conventional pesticides or fertilizers.

Worth any extra cost? Maybe. Organic eggs have no nutritional benefit over eggs from conventionally raised hens. While it’s not clear whether pesticides and fertilizers can make their way into eggs, organic eggs are guaranteed to be from cage-free hens with at least some access to the outdoors, and producers must meet the higher animal-welfare standards of the organic certification as defined by the USDA.

No added hormones

Hormones aren’t allowed to be given to chickens, ever. If the claim “no hormones added” is used on labels, it must be followed by a statement that says “Federal regulations prohibit the use of hormones,” or a similar qualifier.

Worth any extra cost? No, there’s no reason to spend more money on eggs that are marketed as “no hormones added,” since no eggs contain added hormones.

No antibiotics

According to the USDA, this claim can be used on eggs if the producer supplies sufficient documentation demonstrating that the birds were raised without antibiotics of any type.

Worth any extra cost? No. The American Egg Board says that nearly all eggs are antibiotic-free, and that if sick hens are given antibiotics, any eggs that are produced are “diverted from human consumption” according to FDA regulations.

Soy-free eggs

Eggs from hens that are fed soy-free diets.

Worth any extra cost? Maybe. Soy-free eggs are possibly beneficial to those who are allergic to soy, although USDA experts say that there’s no evidence that any of soy’s allergenicity is carried over into the eggs.

Vitamin-enhanced

The hens’ diets are modified by adding ingredients such as alfalfa, rice bran and sea kelp to their feed, resulting in eggs with higher levels of nutrients such as B vitamins and vitamins A, D and E.

Worth any extra cost? Probably not. For most of us, the amounts of vitamins provided by these eggs won’t provide a significant nutrient boost, certainly nothing compared to what we can get through a varied diet of wholesome foods or an over-the-counter multivitamin and mineral supplement.

Omega-3 enriched

Ingredients such as flaxseed, algae and fish oils are added to hens’ diets, increasing the omega-3 content from about 30 mg per egg to 100 to 600-plus mg per egg.

Worth any extra cost? Not really. The two types of omega-3s shown to have the most health benefits are EPA (eicosapentaenoic acid) and DHA (docosahexaenoic acid), but most omega-3-fortified eggs contain just a small amount of these specific omega-3s (far less than what’s in fish or fish oil capsules), and have much more ALA (alpha-linoleic acid), which doesn’t appear to have the same health benefits. And although some brands tout that their omega-3-fortified eggs contain as much as 25 percent less saturated fat, eggs are already low in saturated fat (about 1.5 gram per egg), so the savings really isn’t significant.

Grade

This is determined by interior qualities (including defects or freshness) and exterior factors including shell quality. Most eggs sold are grade AA or A, and there’s very little difference between the two. Grade B eggs are just as good to eat, but they have different qualities, such as thinner whites, so tend to be better used in baked goods or as an omelet, whereas Grades AA and A work better for dishes like fried eggs, when you don’t want the white to spread.

Worth any extra cost? Probably not. There’s no difference in nutritional value between the grades; any extra money spent on AA is just for looks.

Size

Extra large, large and medium are the most common sizes sold, although size classifications range from jumbo down to small and peewee eggs.

Worth any extra cost? Maybe. A jumbo egg has nearly 8 grams of protein (and 90 calories) – about 50 percent more than the 5.3 grams of protein (and 63 calories) found in a medium egg, giving you more protein-rich nutrition for your buck. Plus, most recipes are based on large eggs, so if the recipe calls for many eggs, you may need to adjust the number of eggs used.

Regardless of the type of egg you buy, you can cut back on fat and calories without sacrificing protein by using just one whole egg and adding extra egg whites. And be aware that opting for just pure whites isn’t necessarily better: Adding just one egg yolk to your three or four egg whites will enhance the flavor, texture and nutritional benefits, because it contains certain key nutrients that aren’t found in the egg whites.

So unless you’re striving to live an organic (or mostly organic) lifestyle, feel strongly about how the hens were raised, or have a soy allergy, there’s nothing wrong with ordinary store-bought eggs (or ordinary non-organic, non-omega-fortified eggs from the farmer’s market.)


Chocolate Chip and Oatmeal Chewy Bars Recipe

By Kristina LaRue, RD, CSSD, LDN, CLT

These are the ultimate homemade snack — soft like an oatmeal cookie and made with wholesome ingredients you can feel good about.

Ingredients
½ cup natural or regular peanut butter
1 extra ripe banana, pureed
¼ cup clover honey
2 tablespoons water
¼ teaspoon coarse crystal salt
2 cups quick-cooking rolled oats
⅓ cup raisins
⅓ cup semi-sweet mini chocolate chips

Directions
Preheat oven to 325°F. Line an 8-by-8-inch baking dish with parchment paper.
Whisk together peanut butter, banana, honey, water and salt. Stir in oats, raisins and chocolate chips. Pour mixture into baking dish. Mash down firmly to form to pan and smooth top with back of a spoon.
Bake for 25 minutes. Place bars in freezer for 15 minutes to cool quickly and slice into 16 individual bars. To keep fresh, store in airtight container in refrigerator for up to seven days.

Nutrition Information
Serving size: 1 bar (35 grams)
Serves 16
Calories: 135; Total fat: 6g; Saturated fat: 2g; Cholesterol: 0mg; Sodium: 66mg; Carbohydrates: 20g; Fiber: 2g; Sugars: 10g; Protein: 3g; Potassium: 148mg; Phosphorus: 83mg

Bulgar Salad

Ingredients
¾ cup bulgar
1 ¼ cup water
4 oz cheese (I cup chopped ¼ inch cubes)
1 cup chopped broccoli
1 cup chopped red bell pepper
1 cup chopped carrot
½ cup chopped green onion or red onion
Cilantro to taste (likely 1/4 of a bundle chopped)
2 Tbsp Lemon juice
½ tsp salt
1-2 Tbsp olive or vegetable oil

Instructions
Combine bulgar and water in saucepan with lid. Heat to a boil then remove immediately. Set aside for 20-30 minutes. Chop cheese, broccoli, red pepper, carrot, and green onion into small pieces. Combine in mixing bowl. In a small bowl, combine lemon juice and salt to dissolve. Then add oil. Drain any extra water from bulgar. Place on paper towel. With another paper towel soak up any excess water. Combine with vegetables. Then add liquid mixture. Mix. Serve, or put in fridge and use within 2 days.